D.L. Sanborn Concrete Construction Backhoe
Residential and Commercial Concrete Construction: Concrete Stamping
Licensed, Bonded and Insured. MHIC #3140
Residential and Commercial Concrete Construction
Agricultural Concrete Construction
Contact D.L. Sanborn Concrete Construction
D.L. Sanborn Concrete Construction Home Page
email D.L. Sanborn Concrete Construction
Concrete Stamping Process
Concrete Stamping Process Step 1: Forming
Form the area you plan on pouring and stamping accordingly.
Concrete Stamping Process Step 2: Adding Color
When using integral color, add the specified amount of color per yard as premeasured by the bucket, and have them mix for a minimum of 5 minutes or until mixed thoroughly.
Concrete Stamping Process Step 3: Bull Floating Concrete Surface
With Integral Color, you don't have to over work the surface which is a common problem with Color Hardeners in freeze thaw environments. Bull float the surface until it closes up and you're ready to stamp.
Concrete Stamping Process Step 4: Applying Release Agent
When the concrete is ready to stamp, apply your desired release agent to the surface with either a brush, burlap bag or by hand. Your release agent acts as barrier between the concrete and your stamps, while giving you that antique appearance after washing off.
Concrete Stamping Process Step 5: Stamping Concrete
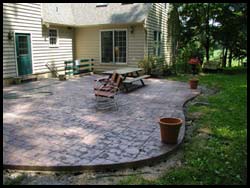
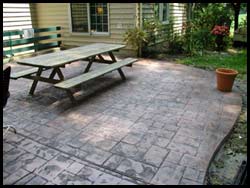
The benefit of the Stampcrete stamp would include the authentic appearance you receive as well as the durability in the stamp it self. This gives the contractor more time to complete a quality project as shown.
Concrete Stamping Process Step 6: Washing Off Excess Release Agent
Using a regular garden hose and scrub brush, remove the desired amount of release to your liking, leaving enough to accent your joint lines and achieving an antique appearance.
Concrete Stamping Process Step 7: Sealing Surface, Two Coats
After the surface is completely dry and free of moisture, apply two coats of either solvent base sealer. This can be either sprayed on with a Chapin Sprayer or rolled on.
Concrete Stamping Process Step 8: Finished Stampcrete Surface
What you have as a result is a aesthetically beautiful surface that anyone would be proud to own.

Concrete Stamping Process Finished Product
Concrete Stamping, D.L. Sanborn Concrete Construction
Select a Concrete Stamp Pattern
Select a Concrete Stamp Color
Select a Concrete Stamp Release